Showing posts with label Sewing. Show all posts

Wednesday, September 12, 2012

Angelina Ballerina Ears


Penelope LOVES Angelina Ballerina. So I made her some mouse ears with a bow for her halloween costume. I hope your little Angelina Ballerina lover likes them too. I think you can just right click and save the picture below. Then print at full size. It should fill a regular piece of paper.
Ok, and by "attach to elastic", I mean fold over where I've marked a dotted line and just stitch it down. These aren't super fancy, but it does the trick. :) And because I already had the dance gear and felt on hand... This costume is FREE!!! Score one for Mom!!

***and pardon her tatted up legs. She's developing a love of stick on tattoos from her big brother. 

Wednesday, August 1, 2012

Flutter Sleeve Dress Tutorial

Flutter Sleeve Dress
My goal for this school year was to have at least 3 handmade things for her to wear the first week of school and I did it, barely. :) Here is the last thing I made, but certainly my favorite. I made it in one evening. 
It was super easy and quick.

Go here to Lil Blue Boo for basic instructions on how to construct the chest band, and dress... then come back here for the flutter sleeve straps. If you are using fabric with little stretch, I do recommend adding at least 2" to the chest measurement or making sure they take a deep breath when you measure since there will be no closure and this is gonna just slip over their head. You want to make sure it will be comfortable.
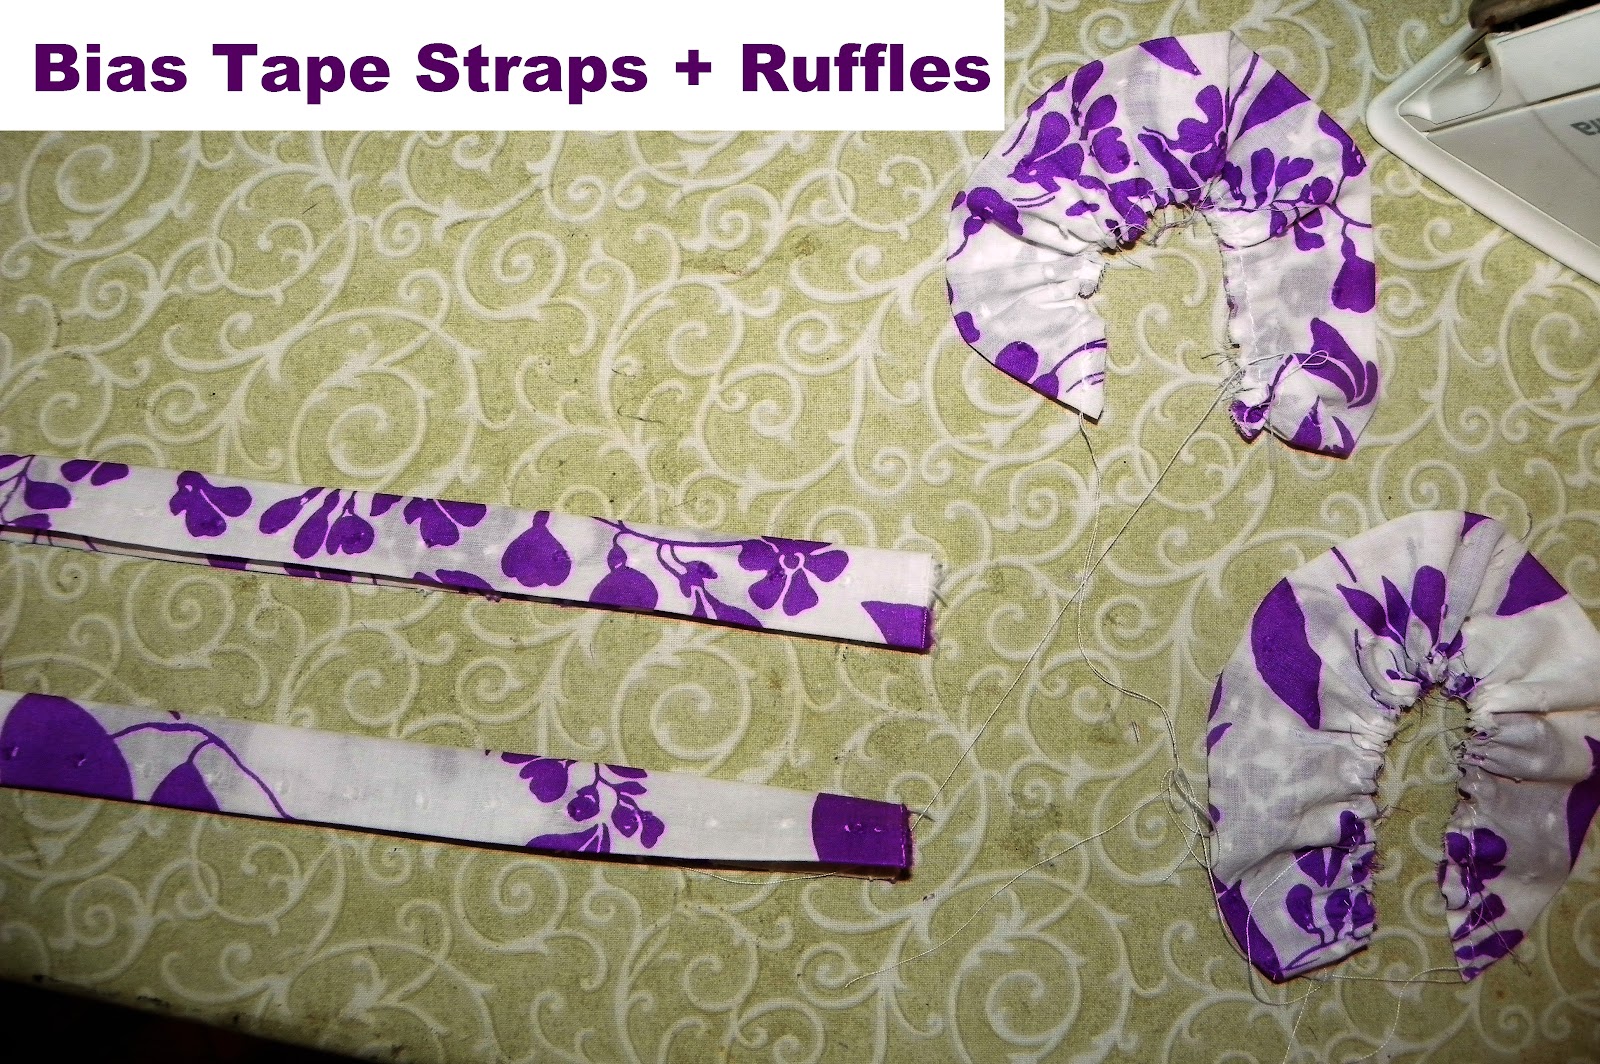
My straps were about 12 inches long and 3.5 inches wide. Iron the width in half  then open and fold the edges to the center and iron then fold in half again. You are basically making bias tape (just not on the bias). Next cut two strips 7 inches by 3 inches for the ruffles.  Then you will cut a curve to the cut edge and sew a basting stitch on the open side. Go to my flutter sleeve tutorial here for details and pictures on how to make those.

Pin those little ruffles inside the straps. Sew down both sides of the straps.

Try it on your little girl. Pin in place. I pinned mine about 2 3/4 inches from center front and back. Next top stitch around the top of the dress. Then clip off any extra length on your straps below your stitching. 
Lastly, I added a fabric flower pin I made using this tutorial, here. I used white cotton hot glued to a felt base. I did make it a pin rather than sewing it on because I figure he dress is going to get a lot of washing, probably more than that little flower will be able to handle. 

Perry Jayne


Saturday, April 14, 2012

Tooth Fairy Doll


We have a wiggly tooth at our house! 

It's been loose for over a week now and I am sure will be coming out any day now. At our house we don't usually do fictional characters, Santa Claus, Easter Bunny, and the Tooth Fairy. Our kids know they are not real. But it's still fun to pretend right? In light of our very first loose tooth, I decided that we'd still exchange the tooth for money and still have it be a surprise in the morning. I showed Ella a few pictures of tooth pillows or tooth bags on Pinterest and then we saw a tooth fairy doll and she was in love. 


She gave me very specific direction on how she wanted her to look and I did a sketch for Ella to approve.


 She then colored it and I got to work finding the appropriate fabrics. The drawing didn't photograph well, but you get the idea.


So here's our finished product...
I basically used the Black Apple Doll pattern and just added pig tails, wings, and a pocket. If you add pig tails be sure to tuck them in when you sew the head. I found that out the hard way. I had to seam rip mine and sew it again because her piggies ended up inside her head when I turned it after sewing her head. Ugh! And her wings are a bit too floppy. However, Ella (and little sister, Penelope) love the doll, so I deem it a success.


 Don't tell Ella but her little sister played with her doll, while she was at school.

Wednesday, November 9, 2011

McCalls Pattern M5835


I love this little Flutter Dress. I got the fabric cut out and then that's where things got tricky. This pattern in AWFUL when it comes to directions. 
Kathy over at Handmade Dress Haven has an awesome tutorial that makes it SO much easier.
I still need to get better pics with Ella modeling it and then I also need to make one for Little Sister.

Thursday, June 3, 2010

A Failed Attempt


So, I saw this post today over at Craftiness is Not Optional and just had to share my attempt. It's a pretty stark contrast. LOL. This is a failed mermaid softie attempt. LOL. A couple months ago, my daughter saw a stuffed mermaid at Wal-mart and wanted it..for the new baby. Sure. Anyway, I said, "Oh, Mommy can make you one." So I drew this sketch and went to work. Oh wow. It did NOT work out well. I didn't even bother trying to stuff the poor things arms. I'm pretty good at sketching out something for an applique... not so much when it comes to 3-D figures. I'll try again. And I think I'll try to make it more like the mermaids that I use on my shirts... 

but anyway- just in case you needed a good laugh. Oh, and the funny thing-she likes it. It's on her bed with her other much cuter stuffed things. :)

Friday, May 28, 2010

Changing Pad Cover for Baby


Our Little One is going to rooming in with us in our bedroom - probably until he or she is weaned. Then the new baby will move in with either big sister or big brother. But for now, I wanted all of the Baby Bedding, etc. to match our bedroom. So, I made this new changing pad cover and lined the drawers of the changing table with the gray dot, also. 

This is our quilt on our bed (and our Boston Terrier too). The color is off in this picture- It's more of a light citrus green-not yellow. Anyway, this is what I'm matching my baby things with.

The following is more the story of how I made my changing pad- if you need really good precise directions- you're better off following the link I included to a different tutorial at the very bottom. So you've been warned. :)

A few pictures of the process
First measure your changing pad cover. Length, Width, and Height.
And then go crazy with pen & paper trying to do the math to make it work. For me this involved even more math than really necessary because I decided to make mine in strips.
My Changing Pad measured like this: 
32 inches long
24.5 inches wide
3 inches tall (at the corners)

Now I also measured the changing pad cover that I had been using- which was tough because it had elastic in it. I just pulled it tight and measured. 
My old cover measured:
41 inches long
29.5 inches wide
5.5 inches tall

So if your pad measures differently- you can add about 8-9 inches to the length, 5-6 in width, and about 2 inches in height. (The height measurement is what you use to cut the squares out of the corners- later).

These measurements would have worked really well- had I used one piece of fabric. I will start by saying that I should have allowed more width in mine. I didn't allow enough for the seam allowances of sewing all those strips together. I also could have shortened the length a tad, but once the elastic was in - that was fine.
So I'll give you my measurements...but know that if your changing pad is like mine...you'll need to add some to make up for the seam allowance.
I'll start from the edge and work in.

All of these were 41 inches long- these are the widths...
(2 strips) Stone Ta Dot- 1.5 inches (should have been more like 2 inches at least)
(2 strips) White Humming Bird- 3.5 inches (should have been more like 4 inches)
(2 strips) Ta Dot- 4.5 inches
(1 strips) White Chenille- 10.5 inches

The one step that is vital, that I did not photograph is where you cut a square out of each corner and then sew  those sides together to make a corner. I just laid my fabric on my changing pad and marked off where I wanted to make my cuts with a washable sewing marker. - But you should be able to use your measurement from the height of your changing table. My measurements seemed a little off... so I just tried it out on the pad and marked it. And that worked well. 

This is all my crazy math. 
Wish someone would have told me to pay attention in Math class 
because it would be useful in sewing. LOL.


Then just make a little casing for your elastic and run it through.
This is a pretty forgiving project- since there's no top stitching- you don't see wonky sewing lines and the elastic takes up any slack from mis-measurement. So as long as you get close- it's pretty good.

Prudent Baby has a great tutorial for how to make a changing pad cover that shows more steps and pictures than I do - so if you're lost click over there and check out her tutorial. 

Wednesday, May 12, 2010

Quilt Pictures - as promised

Here it is. So happy to finish it. This is my very first attempt at making a quilt. I learned a lot. Just so excited to have it ready for our little one to use.
My most favorite part is the center block with the deer applique, hand embroidery, and hand quilting. Very pleased that I decided to add this in.

Wednesday, March 10, 2010

FINISHED the Market Skirt

Oh, it's so CUTE!!! I love it. Can't wait to make more. I already have set aside a few fabrics from my stash as "Market Skirt" material. It really doesn't take much fabric, either. It will be a great skirt for transitioning into Spring, just put some leggings or jean under when its too cold for bare legs. I just love it!
*I hadn't put the pockets on in that first photo on the upper left. I just got so excited, and started taking pics before it was done. :)

You can find the tutorial with great instructions and pictures on Dana's blog MADE. PS I do not own a surger and it worked out fine. I just did a tiny rolled hem when it called for surging. You could do a zig zag, but I'm missing all but one foot for my sewing machine (I know that's ridiculous). So I am limited to a straight stitch on my machine until I can either buy/ find some other feet for my machine. :)

Friday, March 5, 2010

Made's Market Skirt

Worked on this Market Skirt yesterday by Made. Here's the link.
I just need to add the pockets.

Wednesday, February 17, 2010

Progress on my Baby's Quilt


I hand quilted just the middle block. The rest of the quilt is just hand tied.

I'm now 6 months along in this pregnancy. We're waiting to find out the gender this time. I'm so excited to have that surprise on the big day. We already have a boy and girl, so we will be super pleased to have either gender.
The only down side to waiting to find out the gender is that I can't get sewing on pretty girly things, or cute boyish things. So far, I 've had to settle with making a few gender neutral bibs. However, my big project lately has been a very colorful and crazy looking quilt. I finished the quilt top, quilt "sandwich", tied it, and hand quilted the middle block. I'm working on the binding now.


This is my first quilt EVER. I've just been trying to pick up tips on blogs and such online. Here's a few that have been very helpful...
Here's our little one at 18 weeks.

Friday, January 29, 2010

Baby Doll Party Hat Tutorial


*You may need to adjust measurements for your particular Baby Doll, but I included the measurements I used for our dolls as a starting point.

1. Cut out a semi circle of Stiff Felt- Mine was 9 inches long on the straight side and about 4 1/2 inches at the widest part of the semi circle. (If you had a protractor you could make a super nice circle with a 4 1/2 inch radius and then just cut it in half.)
2. Cover with Fabric. I used wonder under and ironed mine on- you could just wrap around and sew or glue it on, whatever.
3. Sew on ric rac if you like. Sew on some elastic for the chin strap. My chin strap for Bitty Baby was 8 inches long and about 7 inches for the Dora/Diego Dolls. But it stretches so there's some wiggle room.
4.Roll into a cone. Sew shut by hand.
5. Add a little flower or pom pom on top.


Tuesday, December 29, 2009

Beginnings

...of a Baby Quilt.
I've been bit by the sewing bug. I feel like I just HAVE to sew some baby things. It's been tough, not knowing the gender. I'm trying to just make bright colored things that are pretty gender neutral. These are a few of my quilt blocks, so far. I followed the directions I found on Chickpea Sewing Studio in her side bar under "Birthing Quilt". There is a pdf that you can download with instructions.  Basically, I made a nine-patch and then cut that in 4 equal parts. I'll keep you posted on how it's going so far, I've only got about 12 X 12 inches of quilt... so I've got a LOT more cutting and sewing to do... but I've got time.

Tuesday, September 15, 2009

Needle Book Tutorial

I needed a way to keep my needles safe and in one spot. I hated putting my embroidery needles into my tomato with all the other pins and things, so one evening I made this. I made it to fit snugly into my Organization box. And I love it. I've made several for friends and my mom. It will literally take you longer to gather the supplies than it will to put it together. Hope you'll try it.

You'll need:
some small scraps of felt and fabric
pinking shears & regular scissors
needle
embroidery floss

1. Cut out some rectangles with your pinking shears from the felt and decorative fabric.
Felt rectangle should measure around 7 inches by 1.5 inches. The decorative fabric (you can use cotton or flannel, really whatever you want) should measure around 2.5 inches by 1 inch.

2. Cut out your "pages" (I use felt for this part too) with your regular scissors. This rectangle will be about 6 inches by 1.25 inches.

3. Sew the decorative fabric to the front of the felt. I just sew knots in each corner.

4. fold both pieces to find the middle, than stich a running stitch to hold the "pages" in place.
5. Insert your needles for safe keeping.
Here's your finished little needle book. That will fit really nicely in your floss organization box.

My Little needle book is tucked into my box in that upper left compartment. Sorry, I took this picture for another craft and I'm feeling too lazy to take another picture right now. :)
By the way, if you use Embroidery Floss at all and don't have one of these nifty organizing boxes, you should get one. It is well worth the few dollars they cost. And they come with awesome little plastic bobbins to wind your floss onto. You can find them at any Hobby Lobby, JoAnn's, or Michaels.

Friday, August 7, 2009

Birthday Bunting finished!!


*anyone notice the missing buttons on my calculator? 
That's courtesy my almost 2 year old boy. Thanks, Hudson!

WARNING: Making Bunting requires Math. I love to sew, but math is not my favorite subject. Who knew sewing would require so much math? So I already posted HERE about getting your triangles ready this post is just about attaching them to the bias tape. I bought, Extra Wide Double Fold 1/2" wide bias tape. If you're wondering.

*Ok, so I just spent 10  minutes trying to remember how I came up with numbers I did and...I can't remember, so I'll just give you my measurements and hopefully that will be of some help. I had 6 yrds of bias tape. I had 16 triangles of around 9 inches wide. I gave myself 10 inches to hang it by and then spaced them 3 inches apart, and ended up cutting off about 12 inches at the end.
My girly helped me measure out 3 inches in between each flag. She also commented that when she is a momma that she will sew and that she won't touch the sharp end of those "beedles" (my pins). 
I sandwiched the flags inside the bias tape and pinned each flag in place. My bunting is double sided, so the bias tape works perfectly for this.

then stitched them up. Using pre-made bias tape made this super easy. You could also make a casing on your flags and run a cord through, but that would have taken more work, I think.

So here's the finished birthday bunting. This is only part of it. My space is too small to hang it all up, but at the church (where the party is), it will be able to all hang up.) I really like it.

And so does the Birthday Boy.

 
01 09 10